Latest Post
Tampilkan postingan dengan label Tools. Tampilkan semua postingan

DOTA 2 GUIDE program Version 1.51 (UI rework!)

New pictures, new names, new everything. It's very simple to understand:
You get two drop down lists: Hero counters and Select hero.
In hero counters, you select which hero you want to counter. It will then show up to 10 pictures of heroes that counter it, and if you hower over them, the tool tip will say why.
When you press select hero, it'll give you a hero picture, 4 skill pictures and sometimes bonus pictures(for example 10 more invoker spells) Each has a tool tip consisting of: Dota 2 wiki information and playdota information combined. Then you choose your role(carry, support, initiator, etc...) and lane(jungle included). When you're finished, you'll get a skill build and a full item build for all stages of the game. Every item ALSO has a tool tip. So be sure to read them all as some might say "buy up to 3 of these" for example. Note: luxury items also include situational items. So yeah, go get it, champs in the making.

Picture nr. 1 - brewmaster with his 10 bonus skills:

Picture nr. 2 - a sample picture of a hero without 10 skills. Isn't the right side just pretty:

Download :


Inform me on any issues you notice. You'll need java 1.6 to open this.

edit: derp-a-derp-a-derp, forgot to add the new pictures.

Source : Here
 

Dota ToolKit 3.3c (DTK works 6.72)

I bring to you the "Dota Tool Kit" by crisgon

Run as a administrator if you are having troubles.

FEATURES:

Remap:
-Inventory
-Mouse Wheel
-Skills , Selfcast and Autocast

CustomKeys:
-A quick and easy customkey generator (remember to check "Use customkeys" box)

Guide:
-An easy and quick guide to some heroes (will add them constantly)

Quick:
-Send messages
-Quick launch
-Some configurations for wc3 (widescreen adjustment, improve of fps , wc3 path , healthbars)
-Run wc3 on window with mouse capturer
-A quick explanation of my tool features


Download Here


Credts: Crisgon
 

MeepoBot

Download MeepoBot:
Guide:
1. Download MeepoBot v1.1
2. Extract it using WinRAR to any folder.
3. Run Warcraft 3 & MeepoBot.
4. Set the Hotkey for Meepo's Poof.
5. Join a game.
6. Press your assigned hotkey to poof.
7. Start Ownage!


Notes:
• This program will always poof to the real Meepo.
• Currently, It only works on two resolutions.
- 1024*768
- 1280*1024
• This program is only tested on Windows XP - It might work in Windows 7 & Vista.
• Your mouse will be controlled for 1 second by MeepoBot to perform it's operation.
• You must run the MeepoBot for it's appropriate resolution otherwise it won't work.
• Some leagues/tournaments won't allow the use of this program.

 Download Here


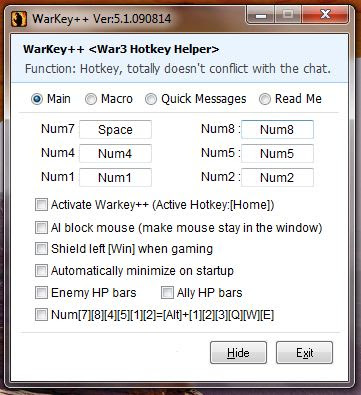
Warkey++

WarKey++ Features:
1. Supports Warcraft 1.26 patch and other previous versions.
2. Active/Disable Enemy/Ally HP bars.
3. Macro Hotkeys.
4. Quick Messages for Allied and All.
5. Disable Left [Win] Key.
6. Very simple and nice interface. Strong function.
7. Set Inventory Keys to, ALT+[1][2][3][4][5].
8. Program Hotkeys.
9. Makes mouse cursor stay in window while playing in Window Mode.

Warkey++

The great feature of WarKey++ is, it does not effect the chat system when you have hotkeys turned on (it will automatically disable warkey when typing).

Program Hotkeys:
- Active/disable "hotkey function" hotkey [Home]
- Active/disable "AI block mouse" hotkey [End]
- (Alt+[) Hotkey: show ally's hp bar
- (Alt+]) Hotkey: show enemy's hp bar
- (Alt+M) Hotkey: check current state of function
- (Alt+P) Hotkey: Pause/Resume "game"
- (Alt+F4) Hotkey: Quit Game


Download Here


Crisgon DotA Toolkit v3.3b

Crisgon DotA Toolkit v3.3b
Warcraft 3 Tools Crigson• Inventory Hotkeys
Allows you to remap your Warcraft 3 Inventory Hotkeys to any key.

• Mouse Wheel Bind:
You can bind any Keyboard key to your mouse wheel.

• Skill, Autocast & Selfcast.
This allows to set your desired hotkey for skills and then use it for Auto-cast & Selfcast.

• Warcraft 3 CustomKeys (Spell Hotkeys)
Great feature, Permits you to generate CustomKeys.txt for your Spells (abilities) and other action/movement keys. Such as: Q,W,E,R etc.
Crigson DotA ToolkitNote: You need to activate Custom Keys from Warcraft 3 gameplay settings in order to make it work.

• Invoker Super Keys (Invoker Bot)
This allows you to bind hotkey for making Invoker skills (you can make Invoker spells by pressing one key)

• Meepo Super Keys (meepo bot)

1. Poof Boot:
Bind 1 key for all Meepo clone's poof, they will poof to the original Geomancer.
2. Earthbind Bot:
This feature automatically switches to the next Meepo after casting Earthbind, you just need to activate it using a Hotkey.
• Quick Messages:
For spammers only.. Kidding, This will allow you to send Quick Messages by binding a key.

Tip: You can use prefix, for e.g
All: "your text here" - This will send messages in all.
Our: "your text here" - This will send in allies.

• Quick Launch:
Launch any other program by selecting it or copy and paste it's path and clicking launch.

• Toggle Health Bars/CustomKeys
Allows you to switch Health bars & CustomKeys ON or OFF during game using a hotkey.


 Download Here
 

Wacraft Switcher


All in One Warcraft Version Switcher. Yeah, it's available now. Currently, there are 7 Warcraft 3 TFT versions archived files are available, Warcraft Patch 1.20e, 1.21, 1.21b, 1.22, 1.23, 1.24a, 1.24b, 1.24c, 1.24d, 1.24e, 1.25b, 1.26. You can download any Warcraft 3 Patch version Switcher file you want to use. Check the download links & guide..

Steps:

1a. Download All In One Warcraft Version Switcher from the link below and extract it. It is a full version switcher pack with all the version files in it, you dont need to download any other files.

OR

1b. Download the Warcraft 3 version switcher and it's file(s) you want to use with Version Switcher.

Download Warcraft Version Switcher:
Warcraft-Version-Switcher.zip (617 KB)

Warcraft 1.20 Patch File:
TFT Version 1.20.zip

Warcraft 1.21 Patch File:
TFT Version 1.21.zip

Warcraft 1.21b Patch File:
TFT Version 1.21b

Warcraft 1.22 Patch File:
TFT Version 1.22.zip

Warcraft 1.23 Patch File:
TFT Version 1.23.zip

Warcraft 1.24 Patch File:
TFT Version 1.24.zip

Warcraft 1.24b Patch File:
TFT Version 1.24b.zip

Warcraft 1.24d Patch File:
TFT Version 1.24d.zip

Warcraft 1.24e Patch File:
TFT_Version_1.24e.zip
Warcraft 1.25b Patch File:
TFT Version 1.25b.zip
Warcraft 1.26 Patch File:
TFT Version 1.26.zip

2. After Downloading the patch version file(s), DO NOT EXTRACT THEM. Just copy the files and paste in your "wvs" folder of Warcraft Version Switcher.

3. Now run wvs.exe & you're done.

Notes:
If you don't know how to use Warcraft version Switcher, Please read this guide.
If you have any problems, feel free to post a comment about it. 

Sumber : Here
 

Warcraft 3 Styler Download

 Warcraft 3 Styler Download

Warcraft 3 Themes Mods
Here comes a set 46 Warcraft 3 Modded Themes (by K-4-iN) which can make your Warcraft 3 stylish by customizing the old background animation and buttons texture, it doesn't change anything inside the game. These themes are available for Normal & Widescreen resolutions and comes with 7 different color chains. Check out the Warcraft 3 Themes preview & installation guide.

Some Screenshots:

Warcraft 3 Themes (mods) Download:
• Warcraft-3-Themes.rar

Warcraft 3 Mods/Themes Installation Guide:

Step 1, Get the Files
• Download the Warcraft 3 Modded Themes from the links above and extract the compressed file to any folder using WinRAR.

Step 2, Select your theme
• Select your favorite Warcraft 3 theme from "Themes" folder, you will find screenshots there of every theme along with their installation files.

Step 3, Install the Theme
• Now, Run "CUSTOMBG.reg" and copy the "Textures" and "UI" folder to your Warcraft 3 Installation Directory.

Step 4: Enjoy
• Your Warcraft 3 theme is installed!

Step 5: Uninstalling
• If you want to uninstall your Warcraft 3 theme, just remove the "Textures" and "UI" folder from your Warcraft 3 Folder and Run "UNINSTALL.reg" file from your Warcraft 3 Themes directory.

Notes:
• Your Warcraft 3 must be closed during the installation of the modded themes.
• If you do not have functioning background of your theme, go your "Passo2" folder from your selected theme directory. Move/copy the folder "UI" into the "Warcraft III" directory and replace the files.
• All credit goes to K-4-iN for making the Warcraft 3 Mods.
• If you have any problems, just post a comment!

Sumber : Here
 

Bot Argo


alaplaya server: Argo Online

Works as of Aug 30


Recent update:

Latest Argo Patched EXE = Download Link


Cara memakai bot :
1. Update game nya sampai terakhir
2. Download Argo.exe pada Download Link
3. Taruh di folder argo kamu
4. Happy boting

NB : - Mungkin untuk mejalankan bot kamu harus memakai framework (bisa di cari di google)
- Klik kanan lalu Run Administrasi


Feature pada bot :

- Auto attacks/ Pick up
- Auto heal HP/MP/Core
- Ability to Increase run spd/Zoom Limit
- Unlimited Core Double jmp 
- Dbl Jmp+ = Normal Dbl Jump with Jetpack (To turn off, click on booster icon or press "Z")
- Dbl Jmp = Removes Jetpack but Dbl Jump is available (To turn off, click on booster icon or press"Z")
- Auto buff
- Auto heal only ~ for boss hunting/war F6 to turn on and F5 to turn off
- Attacking in Long distance(located in the first page) its for Melee Class Only. what it does is. it will auto press F3(range weapon) and attack the target for a certain interval before spamming your melee skills on it. meaning it will long range attack the target first before using melee attacks

AutoHeal Usage:

Example: HP 400 [ 100 ] = it will auto press hotkey "0" once hp reaches 100 or under 100.

Notes:

- Some times using a instant invoke skill with a timed invoke skill may bug the game or i'm not even sure why the game even bugs when you use 2 atk skills.
- Works best with range class. 
- Melee class can increase the zoom limit to increase the chance of detecting a mob


-Problem's & Fixes-

Problem: Started game, Crashed during loading.
Fix: reinstall

Problem:At character selection screen, character appeared as a shadow. Cannot select and cannot start game.
Fix: downgraded to version 43, character appeared.(Version can be change at the launcher & could be downgraded to re-patch some game bugs)

Problem: Downloaded Crash fix and Yargo. Can't get x3 installed (error appeared when I ran the "first....bat") 
Fix: disabled UAC, X3 was installed.

Problem: Ran program, ran Yargo. Error popped up saying "argo cannot be detected"
Fix: Replaced Argo.exe

Problem: Tabbing Enemies.
Fix: If your char tabs before your allow to hit it, try to increase your "Target delay" on the bottom on the bot(it would re-select another target alot longer before it re-tabs)

Basically all i did was to take all the replies to other forumers and applied it. Many reinstallations required.

Copied & paste from & Problem list by: fedup202002002

Crashing after launch: repatch your game from 46 until the newest version

Fix to the Crashing problem Included now

thanks to pouf for helping me find the problem. download the new fix and reopen my bot. it should work now.

instructions:

1. Extract Crashing Fix.rar‎.
2. open Start this First.bat then press ok (only need to to this once )
3. enjoy the bot.


 Download Here


Sumber : Here
 

Flashdisk menjadi OS portable

Ada kalanya windows kita crash kemudian kita bingung menggambil data di dalam nya... atau ketika koputer terserang virus dan virusnya ga hilang2 karena nempel di system windows sehingga harus pake os lain...
dengan flashdisk anda menjadi os portable hal hal tersebut bisa di atasi..
caranya :
download program berikut:
idws link :
http://www.indowebster.com/portable_OS.html

sebesar 54MB [lebih baik download aja karena simpel dan gak pake ribet] ingat

- extract program yg di download di langkah 1, maka di dalamnya di temukan 5 buah file: bartpe.iso, HPUSBFW.exe,NTDETECT.COM, ntldr, winnt.sif


- format flashdisk/hdd external dengan HPUSBFW.exe dengan tipe FAT jangan yang lain,jika ingin mengganti label pun berilah di program ini jangan melalui explorer program ini juga bisa tuk format umum yang kemampuannya lebih bagus dari pada windows, saya anjurkan kalau menformat gunakanlah program Ini.

- copy lah 4 data sisa nya selain HPUSBFW.exe (bartpe.iso,NTDETECT.COM, ntldr, winnt.sif) kedalam flashdisk. Ok, sekarang FlashDisk anda sudah menjadi Portable OS
silahkan coba booting melalui fd dengan mengganti first boot nya ke flashdisk pada bios.

flashdisk portable ini jg sangat membantu sebagai os cadangan tuk ngebasmi virus yg menginfeksi windows di pc anda.. tinggal copy aja program pcmav ke dalam flashdisk kemudian boot lewat fd dan scan lah... (matikan dulu system restore sebelumnya biar semua vir indo yg menjangkiti pc anda tak bergeliat bangkit lagi)

maka virus yg tadinya ga bisa ke hapus karena locked sekarang akhirnya bisa....
 

Setting Bahasa Jepang in Windows XP

Part 1
Sebenernya udah lama sih :) tapi yah sapa tau ada yang belon tau :D
Windows XP Japanese Input
Notes :: Siapkan CD Windows XP Pro anda sebelum menjalankan tutorial ini, karena sewaktu-waktu jika dibutuhkan [ kecuali bila anda menyimpan file yg diperlukan didalam harddisk ]

Berikut adalah bagaimana menyetting setup Japanese di Windows XP termasuk pengenalan tulisan kanji [ tulis-tangan ]

Catatan :: Saya menggunakan Windows XP Professional, kalo beda versi mungkin bisa beda :P

Installing Japanese Support

Pertama-tama cari Control Panel, dan pilih "Date, Time, Language, and Regional Options"


Terus, pilih "Regional and Language Options"


Sehabis itu, seharusnya akan muncul window "Regional and Language Options" seperti dibawah ini. ( Di layar bagian atas klik tab "Languages" ).[ Hal pertama sesudah memilih tab tersebut, klik "Install files for East Asian Languages". Sesudah itu klik "Apply".


Lanjut, klik tab "Advanced" tab dan pilih "Code page conversion tables" kemudian kasi tanda centang di "Japanese" dan klik "Apply". Sebelum anda melakukan hal ini, anda tidak dapat memasang option bahasa Jepang dalam beberapa area. Udah lupa apa harus reboot ato ngga. [ Saran : install semua dulu habis itu kalo udah beres baru di-reboot ]


Selanjutnya, adalah mengeset bahasa Jepang untuk "Language for non-Unicode programs". Opsi penting ini akan memungkinkan anda menjalankan software 'Japanese' dan juga mengetik bahasa Jepang dalam hampir seluruh hal termasuk nama file, notepad, dll.Namun, beberapa program akan menjadi ngga jalan [ karena tidak support 'Japanese' ].


Ada dua perbedaan yang saya lihat dalam settingan ini : satu perbedaan kecil [ cuman tampilan ], font sistem default menjadi font yang mendukung 'Japanese' dan dalam 'non-unicode Japanese', karakter / menjadi ¥. Setelah menjalankan ini semua paths dalam Windows sekarang akan menjadi simbol ¥. Contoh C:windowssystem32 becomes c:¥windows¥system32.

Perbedaan kedua adalah beberapa program melihat setingan ini untuk menentukan bahasa apa yang dipakai [ sesuai install juga-anda menginstall language pack tersebut atau tidak ]. Dua program tersebut :: Apple's Quicktime and Nero CD. Kalau pengin supaya balik ke bahasa Inggris, anda harus membuat settingan ini kembali ke 'English', reboot, install, kemudian set kembali ke 'Japanese' terus reboot lagi. [ tapi pengalaman gw, tidak perlu reboot juga bisa :P ]

Setelah anda selesai 'rebooting' balik ke "Regional and Language Options" di bagian Control Panel, kembali ke tab "Languages" dan klik "Details..." dibawah "Text services and input languages".


Setelah anda menge-'klik' Details, akan terbuka window ini, klik "Add..."


Set 'input language' ke 'Japanese'. Untuk layout keyboard 'Japanese', cek disini


Klik 'OK' terus, pilih 'Key Settings..."


Pilih "Switch between input languages" and pilih "Change Key Sequence..."


Matikan pilihan "Switch input languages" dan "Switch keyboard layouts". Cara normalnya tekan kombinasi tombol seperti Alt-Shift atau sejenisnya akan menukar antara input 'Japanese' atau 'English'.Tapi anda jg bisa nulis English kok di Japanese Mode. [ Kalau biar ngga terjadi 'kecelakaan' lebih baik matikan opsi ini ]


Pilih "Okay", "Okay", "Okay" Sampai keluar dari Control Panel. Beres deh ^o^.
Catatan :: berlaku untuk bahasa laen juga
 
 
Support : Creating Website | Johny Template | Mas Template
Copyright © 2011. Get More Lesson - All Rights Reserved
Template Created by Creating Website Published by Mas Template
Proudly powered by Blogger